Ip of Safenet Cloud for Windows Login Updated FREE
Ip of Safenet Cloud for Windows Login
![]()
SafeNet Authentication Service (SAS) Integration Guide
SafeNet Authentication Service® (SAS) uses the RADIUS protocol to communicate with many VPN and access-gateway solutions. This document describes how to integrate the SAS two-gene hallmark solution with the WatchGuard Mobile VPN with SSL client.
Platform and Software
The hardware and software used to complete the steps outlined in this document include:
- Firebox with Fireware v11.10.x or college
- SAS, the SafeNet deject-based authentication service
- MobilePASS 8.4.3.86
How SAS Works
This diagram shows the data menses of a multi-gene authentication transaction with the WatchGuard Firebox.

- A user logs on to the WatchGuard Firebox with a I Fourth dimension Password (OTP).
- The Firebox sends a RADIUS request with the user'southward credentials to SAS for validation.
- SAS sends the authentication reply back to the Firebox.
- The user is granted or denied access through the Firebox based on the response from SAS.
Configure SAS
The deployment of SAS multi-factor hallmark for a WatchGuard Firebox with the RADIUS protocol requires:
- User stores synchronized to SAS
- Authenticator assignment in SAS
- WatchGuard Firebox added every bit an hallmark node in SAS
Synchronize User Stores to SAS
Before SAS can authenticate users, y'all must create a user store in SAS for the users who must use multi-factor authentication. User records are created in the SAS user shop with 1 of the these methods:
- Manually — Use the Create User shortcut to create one user at a time
- Manually — Import ane or more than user records in a flat file
- Automatically — Use the SAS Synchronization Agent to synchronize with your Agile Directory/LDAP server
For more information on how to import users to SAS, encounter the section on user creation in the SafeNet Authentication Service Subscriber Account Operator Guide.
In this document, we evidence you how to utilise the Create User shortcut to manually create users. To learn more almost how to create users, see the SafeNet documentation.
- Log in to the SAS Web UI with your Operator business relationship and password.
- Click Create User.
- Type the user's first name, last name, user ID, and electronic mail address. In this example, we create a user named user1.
- Click Add together.


Authenticator Assignment in SAS
SAS supports many hallmark methods that tin can be used every bit secondary authentication factors for users who authenticate through their WatchGuard Firebox:
- eToken Laissez passer
- RB-1 keypad token
- KT-iv token
- SafeNet GOLD
- SMS tokens
- MP-1 software token
- GrIDsure hallmark
- MobilePASS
Authenticators can exist assigned to users in two ways:
- Provisioned Manually — Assign an authenticator to users 1 at a time
-
Provision Rules — Ready rules in SAS that are triggered when group memberships and other user attributes change (an authenticator is assigned automatically to the user)
For more than information about how to provision the unlike authentication methods to the users in the SAS user store, see the provisioning rules department in the SafeNet Authentication Service Subscriber Account Operator Guide.
In this document, nosotros bear witness yous how to manually provision a MobilePASS authenticator and assign it to the user named user1.
- From the user1 item page, select Tokens.
- Click Provision.
- From the Select Authentication Type listing, for Hallmark Blazon select MobilePASS.
An electronic mail message is sent to the electronic mail accost for your user.

- Open the email message and click the link to enroll your MobilePASS token. Below is an case electronic mail message.

- If the MobilePASS token is enrolled successfully, you see an image like to this 1.

Add WatchGuard Firebox every bit an Authentication Node in SAS
You must add together a RADIUS entry in the SAS Authentication Nodes module so that SAS tin can receive RADIUS authentication requests from your Firebox. To do this, you need the IP address of your Firebox and the shared surreptitious to be used by both SAS and the Firebox.
To add an hallmark node in SAS:
- Log in to the SAS console with the Operator account and password.
- Select Comms > Auth Nodes.

- Click the Auth Nodes link.

- Click Add.
- In the Add Auth Nodes tab, in the Auth Node Name text box, type a name to describe this hallmark node.
- In the Host Name text box type the name of the host that will authenticate with SAS.
- In the Low IP Accost in Range text box, type the IP accost of the host that will authenticate with SAS. This is the Firebox IP address that Mobile VPN with SSL clients connect to, which is commonly the primary IP address of the Firebox external interface.
- Select the Configure FreeRADIUS Synchronization check box.
- In the Shared Secret and Ostend Shared Hush-hush text boxes, type a shared secret to utilize for communication with the Firebox.

- Click Salve.
The Auth Node is added to the system.

Configure the Firebox
In this example, we use Fireware Web UI to configure our Firebox. You can also utilise Policy Manager to complete these steps.
Configure the Firebox to use RADIUS server hallmark
To cosign with SAS, you lot must enable the RADIUS server on the Firebox.
- Log in to Fireware Web UI at https://<IP accost of Firebox>:8080.
- Select Authentication > Servers > RADIUS.
- Select the Enable RADIUS Server check box.

- In the IP Address text box, blazon the IP address of the SAS.
- In the Port text box, type the port used in SAS for RADIUS hallmark. The default is port 1812.
- In the Passphrase and Confirm text boxes, type the shared secret you configured for the Auth Node on SAS.
- Click Save.
Add Users
On the Firebox, add together a new user to log on to the RADIUS server.
- Select Authentication > Users and Groups.
- Click Add.
- Select User.
- In the Name text box, type the same user proper noun you lot created on the SAS. In our instance, nosotros type user1.
- From the Authentication Server driblet-downwardly listing, select RADIUS.
- Click OK.
The user is added to the Users and Groups list on the Firebox.

- Click Save.
Configure Mobile VPN with SSL with RADIUS Authentication
To use RADIUS hallmark for user connections with the Mobile VPN with SSL client, enable Mobile VPN with SSL and configure information technology to utilize RADIUS for hallmark.
- Select VPN > Mobile VPN with SSL.
- Select the Activate Mobile VPN with SSL check box.

- In the Main text box, type the IP address to which clients using Mobile VPN with SSL will connect. This is an IP address of the Firebox.
- Select Authentication.
- Select RADIUS (Default) to use the RADIUS authentication server.

- Click Save.
Test the Integration
In this example, we use the Mobile VPN with SSL client to test user authentication.
Download the mobile VPN with SSL client software from the Firebox
- Scan to the SSL VPN web portal. The IP accost is https://<IP of Firebox>:4100/sslvpn.html.

- In the Username text box, type the user proper noun of a user defined in SAS.
- In the Password text box, type the countersign. In our example, we utilize MobilePASS to generate a passcode for employ in the Password text box.

- If necessary, from the Domain drop-down list, select RADIUS.
- Click Login.
The next authentication page appears if this user is authenticated.
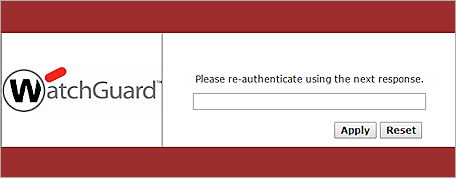
- Generate a new passcode in MobilePASS and type the passcode in the text box.
- Click Apply.
After successful authentication, the download page appears.

- Download the appropriate version of the VPN client for your operating system.
Mobile VPN with SSL Client Authentication
After yous download and install the Mobile VPN with SSL client on your calculator, you can use the same hallmark process to connect to the Firebox with the SSL VPN client.

Ip of Safenet Cloud for Windows Login
DOWNLOAD HERE
Source: https://www.watchguard.com/help/docs/help-center/en-US/Content/Integration-Guides/General/SafeNet%20Authentication%20Service.html
Posted by: navarretetheyet.blogspot.com